About faithfoo

Edtech @ Boise State University

Final App Project – Past Present and Future of Singapore

What I plan to have app user do with app:

Learners will download the app into an android phone allocated to each group by their teachers. They will be brief on instructions on safety and movement around as a group and how they can contact any teacher if they encountered challenging situations in the outdoor settings. They will complete 1 question before they can move on to the next question. Each question contain a street view of the location they are supposed to visit. There are altogether 5 locations. When they complete all questions, they will report to the teacher at the meeting point allocated by the teacher.

Each group will answer the questions by keying in the answers. The app will check for wrong or correct answers and give feedback accordingly.

 Challenges in Development

It was quite a challenge to figure out how to work with activating different screens within the app. I wanted a first screen to introduce the name of the App, followed by a second screen to display the instructions and the final screen to reveal the questions. I tried to google around any tips on the internet and spent almost 2 hours to analyze the different approaches. Finally, I decided to work on using the component visibility element within the App Inventor.

It was challenging to work in the design interface. While I have drawn up the plan last week, I really had to draw the graphics from scratch this week. Some elements (such as clipart of Singapore flag, taxi and 2 persons) are found from creative commons sites, I still had to layout them in an attractive manner for the learners. I can imagine learners being put-off by a boring introduction screen.

Finally, the introduction screen is up

Image

Next, I had to work on the instructions screen.

Image

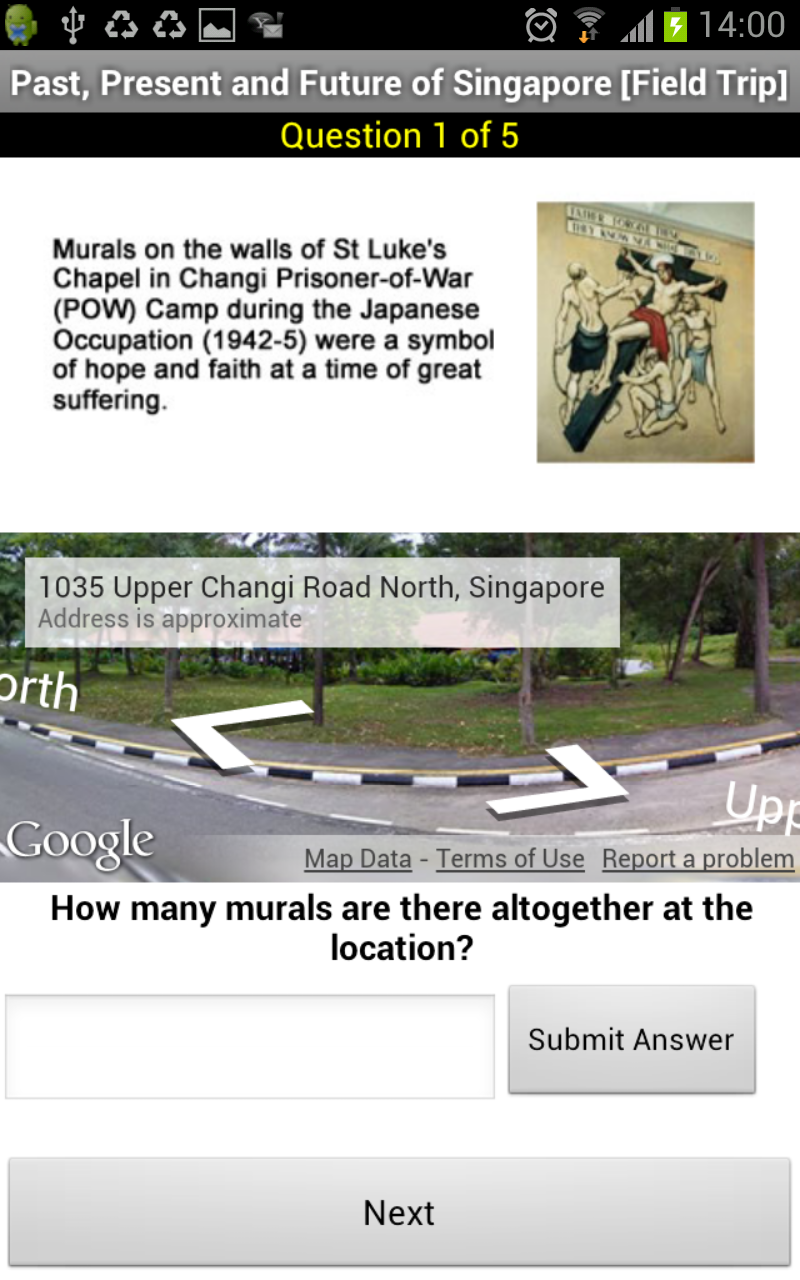
The next challenge is to layout the question screen so that the question background text/image, google map street view and question answer box can be laid out within 1 screen without being too cluttered.

Image

Overall, I had fun with the development.

You can try out the app below

Image

App Design Proposal – Planning Phase

This week, it liken to going into the Analyze and Design phase of the A.D.D.I.E process.

I really like the template provided by our instructor as it provided a systematic flow of our thoughts into the design of the app. I was trying to integrate what I have learnt in this semester together to work towards sometime that I think can be built within a week, as well as usable by learners in Singapore. So far, I am not aware anyone else in Singapore has done this and so i believe it would be a FIRST!

There are some elements that i wanted to incorporate which wasn’t learnt into previous weeks. So I had to do some research on how complex it was to built the code blocks in App Inventor – before deciding that it should be something possible to be done.

The main element is that I wanted a National Education Quiz with integration of questions, Google Maps Street View within the SAME Screen. In previous weeks, the Google Maps View was always done using another web browser APP.

I have attached the ADP if you are keen to know what are the ideas I had in mind.

ADP-Faith

Quiz App

This week’s assignment is really getting more interesting as we moved into constructing quizzes.

I made a mathematic quiz for primary one students:

The following customisation were made

– change questions to mathematics (topic on words used to describe length and height)

– decrease size of answer text box as students only need to input A or B

– allow the app to accept both upper and lower case answer like “A” or “a”, “B” or “b”

– added a question numbering so that learners know how many questions they have attempted

here is the screen capture


I felt that I could improve the app more by allowing users to ‘tap’ on the answer rather than keying in the answer. Will figure out how to do this in the weeks to come

Where is My Car App

This time, i did the following customization

– set a camera option so that people who are more visual in nature can take a photo of the car in the surrounding area

– set the directions mode to “walking” instead of the default driving. My rationale is that since the car is in the carpark, I will need walking directions to get to the car, rather than driving directions. So i search on the internet and came across how to code it to walking direction here

– also change the colors a bit to make it easier for users.

Here are the screen shots


While I managed to integrate the camera into the app. I could only managed to get the canvas to display the camera pictures in landscape mode. Therefore in future, I hope to be able to get the canvas to display in portrait mode as well.


Walking Directions are Set


Code for walking directions


Here is the QR Code.


Singapore Tour App

This week has been an interesting week to develop app with integration of google map.

I remembered I developed an website based html page for a virtual tour about 2 years ago. It is interesting to be able to develop this, an android version!

These are what I had done:
– A screen with a lion icon and the photo of Singapore (Singapore is also known as the Lion City).
I use a cute icon so that it can better interest younger students in using the app.
– Increase height of button so that it is more user friend for younger learners
– 3 sites with historical interest in Singapore (The students need to learn about these sites when they are in primary school)

Here is the QR Code

Here is the screen capture.


I felt that I wanted to do more like some of my peers, but needed more time to work on the codes. I am hoping to provide more information on each site location for the learners through 3 separate screens in the future.

Lady Bug App Customisation and Reflection

This week’s assignment is actually quite fun.

Last week, I had so much problems with the app but this week’s development is much more smooth.

The customisation which I have done are:
– Added a background image for the playing field
– Change the picture of the aphid to constrast better against the background
– Added a Scoring Label to add some form of excitment
– Added a label instructions for gameplay.
– Added a background arcade music to play and loop so that it create a atmosphere of gameplay
– Added a “pacman” style “dead” music to play when the game is over.
– When game restart, the position of the Bug is on the left corner, and the frog on the right corner. This is to prevent random positioning of these two objects

The problems that I encountered during the development is that using the object of sound in the App Inventor doesn’t seem to work well for background music. After doing some research on some android development forums, I discovered the best way to do it is to use a Player and set the music to loop.

Another problem encountered during the testing is that sometimes when the game is restarted, the lady bug and frog will clash immediately, causing the game to stop as soon as it had started. I solved this problem to resetting their positions to the two opposite corners of the screen when the restart button is being pressed.

Watching the History Channel TV yesterday gave some inspiration of incoporating some form of arcade style music into the game. That is why I have selected two sounds to play: One to play in the background during the game, one to play when the game is over. I felt the game over should be more obvious and fun to the players, thus I had selected a “pac-man” style of music since many of us in the class are familiar with pacman game.

Here is the screen capture


Check out my app by scanning the code below

Sprite programming in App Inventor


This week, we tried programming the sprites. It was fun trying to do the scoring part.

While I got the App to work, I am hoping to add on a few more functions if I have the time

– allow users to change picture of sprite (eg. change from mole to rabbit)
– enable timer to speed up when the player reaches a certain score value. This is to add to difficulty of game.
– set certain sprites to appear during certain intervals in the game that may provide extra scoring or reduce scoring

Paint Dot App Development on Android Phone

This week, I really enjoyed the experience of building more difficult apps in Android Phone.

One of the things I have learnt is to integrate what I have learnt in other modules into this module. One of the earlier modules I have took was Graphics Design for Learning in Boise State. I had learnt the important of using Graphics to represent meanings and functions, and that is what i have decided to use graphic icons for some of the buttons functionality in the Paint Dot App.

I also began to appreciate that App Development takes a lot of trial and error. I wanted to provide users with more choices, rather than being stuck to just 1 image for coloring. So I decided to introduce 2 more images in the thumbnail format for selection. Since this function was not taught in week 4’s lesson, so I had to search around for possible functions to use.

This is the screen shot of app before the thumbnail functions were added.

Adding in more codes now

Here it comes the final version (as least for now)

Purr App on Andriod Phone

It took me a while before I could sort through the readings, install the App Inventor and set up my Samsung Note phone to work together. But it was really quite fun to learn things from scratch, and the “wow” feeling that I had when I got my App to work is really worthwhile.

I managed to get an image of a kitten with the original meow sound from the tutorial. And I also added a food bowl which will be filled up with a fish when the user tap on the bowl.

There was actually more things that I wish to customise, such as getting the kitty to open her mouth (by swapping the button image). But I had some problem with it due to lack of the programming language commands within the App Inventor. But i guess i will eventually work it all out in a few weeks time.


Worked Example Screencast – Words Used to Describe Length

The worked example screencast is targeted at learners aged 7 to 8 with the following learning objectives:

– List 4 sets of words used to describe length
(Tall and Taller, Short and Shorter, Long and Longer, High and Higher)

– Compare length of objects or things using the relevant words to describe length

Duration of the screencast: 19 minutes 30 seconds

Software used: Powerpoint 2010, Camtasia Studio
Equipment used: Bamboo Tablet Pen, Wireless Headset with Microphone